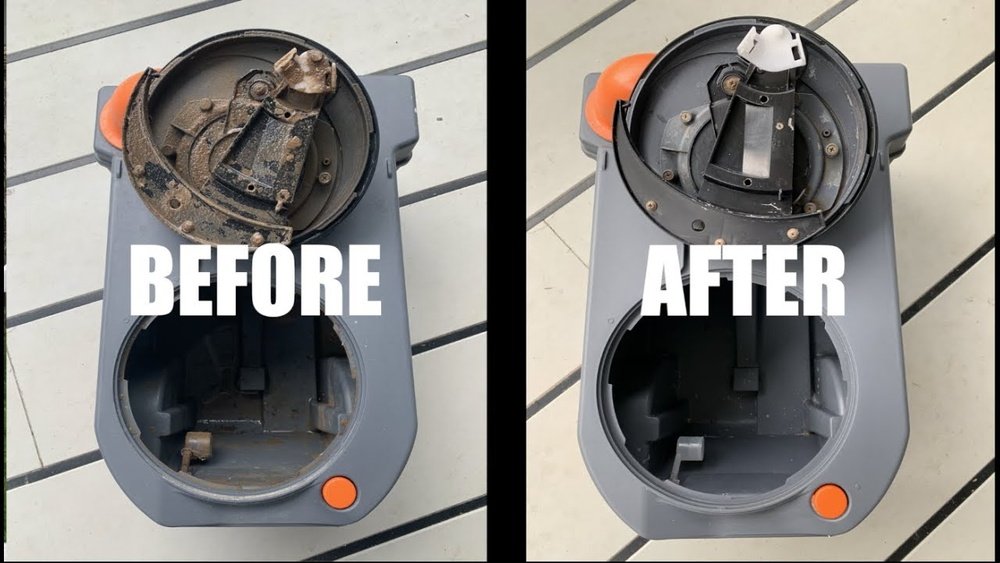
Best Way to Clean Toilet Cassette: Quick and Easy Guide
Cleaning a toilet cassette is not most people’s idea of fun. If you’ve ever opened one after a long weekend, you know the smell and mess can be worse than you expected. Old stains, stubborn odors, and that “what did I just touch?
” feeling make the job feel overwhelming. Sometimes, even after cleaning, the cassette still smells or leaks—and you wonder if you’re doing something wrong.
But keeping your toilet cassette clean is not only about comfort. It’s about health, safety, and avoiding expensive repairs. Whether you use a cassette toilet in your RV, camper, or boat, you need a cleaning routine that works—without wasting time or money. Let’s break down the best way to clean a toilet cassette, step-by-step. We’ll cover what really works, what doesn’t, and how to keep things fresh for your next trip.
Why Cleaning Your Toilet Cassette Matters
Many people treat their cassette toilet like a simple bucket. But it’s more complex than that. Bacteria, mold, and chemical residues can build up fast. Here’s why regular cleaning is critical:
- Prevents bad smells in your small space
- Stops bacteria and mold from growing inside the cassette
- Protects seals and mechanisms so your toilet lasts longer
- Keeps waste disposal less unpleasant (for you and others)
- Complies with campground rules and keeps your vehicle hygienic
Skipping even one cleaning cycle can make the next much harder. And a poorly cleaned cassette can damage your RV’s reputation at campgrounds—some even check for bad odors!
What You Need To Clean A Toilet Cassette
Before starting, gather the right tools. Using the wrong products can damage seals or leave behind harmful residues.
You’ll need:
- Disposable gloves (nitrile or latex)
- Toilet cassette-friendly cleaner (avoid bleach, which damages seals)
- Soft brush or long-handled toilet brush
- Measuring cup (for chemicals)
- Water (preferably warm)
- Spray bottle with diluted white vinegar
- Old towels or paper towels
- Seal lubricant (for rubber gaskets)
- Protective mask (if you’re sensitive to fumes)
Some users also keep a dedicated bucket for mixing cleaning solution. Always read your cassette toilet manual for any special product warnings.
Step-by-step: The Best Way To Clean A Toilet Cassette
Let’s cut through the hype and get practical. Here’s the most effective, safe way to clean a toilet cassette:
1. Safety And Preparation
- Wear gloves before touching the cassette.
- Open windows or work outdoors if possible.
- Never mix cleaning chemicals—some combinations can create dangerous fumes.
2. Removing The Cassette
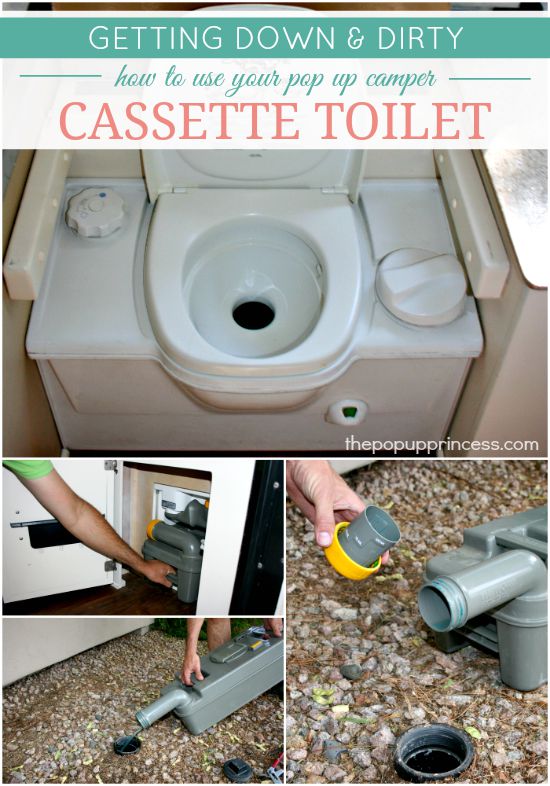
- Release the lock mechanism.
- Slide the cassette out gently to avoid spills.
- Keep the cassette upright.
Tip: If the cassette feels heavy, use both hands or ask for help. Dropping it can create a big mess.
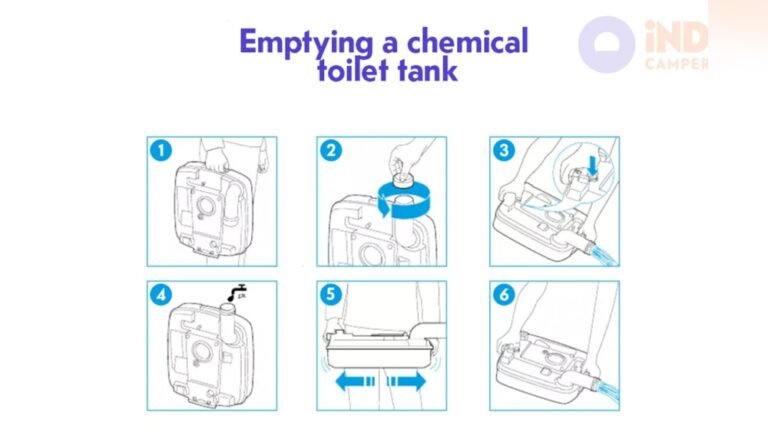
3. Emptying Waste
- Carry the cassette to a designated dump station. Never dump waste in nature—it’s illegal and harmful.
- Unscrew the spout cap and aim into the dump point.
- Press the air vent button (if your model has one) to control flow and avoid splashes.
- Rinse the spout after pouring.
Example: Many cassettes hold 4-5 gallons. If you’re traveling in hot weather, empty daily to avoid strong odors.
4. Rinsing The Cassette
- Add about 1–2 liters of clean water.
- Swirl vigorously, close the cap, and shake gently.
- Pour out the rinse water.
- Repeat until water runs mostly clear.
Insider tip: Use warm water (not hot) for better results. Hot water may warp plastic.
5. Cleaning The Inside
- Spray the interior with a cassette-safe cleaner or diluted vinegar.
- Use a soft brush to scrub surfaces, focusing on corners and the bottom.
- For stubborn stains, let the cleaner sit for 10–15 minutes.
- Avoid abrasive pads—they scratch plastic and make it harder to clean next time.
Real user mistake: Some people use bleach for a “deep clean.” This weakens rubber seals and leads to leaks. Use specialized toilet cassette cleaners instead.
6. Cleaning The Spout And Seals
- Pay attention to the pouring spout—waste can build up here.
- Clean rubber seals with a damp cloth and mild cleaner.
- Dry all parts with a towel.
- Apply a thin layer of seal lubricant to rubber gaskets. This keeps them soft and leak-free.
7. Odor Control And Final Rinse
- Add a final rinse with a water and vinegar mix (about 1: 5 ratio).
- Rinse out, then leave the cassette open to air dry for at least 30 minutes.
- If you must close it, leave the cap slightly loose to avoid pressure build-up.
8. Adding Chemicals And Reinstalling
- After drying, add the recommended amount of toilet chemical and water.
- Slide the cassette back into place.
- Wipe down the exterior with a damp cloth.
Table: Typical Cassette Toilet Chemicals and Their Features
| Chemical Type | Main Benefit | Limitations |
|---|---|---|
| Blue fluid | Breaks down waste, controls odor | Not always eco-friendly |
| Green fluid | Eco-friendly, safe for septic tanks | May be less powerful |
| Bio tablets | Easy to use, less mess | Costly for long trips |
9. Maintaining Between Cleanings
- Rinse after every dump, not just at the end of your trip.
- Avoid using too much toilet paper—it clogs cassettes.
- Use only RV-safe paper that breaks down quickly.
- Check seals monthly and lubricate as needed.
Non-obvious insight: If your cassette isn’t used for weeks, store it open in a dry place. This prevents mold and sticky seals.
Common Mistakes When Cleaning A Toilet Cassette
Many users make simple mistakes that create bigger problems later. Here’s what to avoid:
- Using harsh chemicals like bleach or drain cleaner (damages seals)
- Skipping rubber seal maintenance (leads to leaks)
- Forgetting to rinse the spout (creates bad smells)
- Not airing out the cassette after cleaning (traps moisture inside)
- Overfilling with chemicals (wastes money, makes no difference)
Real scenario: A camper used bleach for a “deep clean.” Three weeks later, their cassette started leaking around the valve. The repair cost was higher than a year’s supply of proper cleaner.

Credit: myrigadventures.com
How Often Should You Clean A Toilet Cassette?
- After every use: Empty waste as soon as possible.
- Once a week: Clean thoroughly with brush and cleaner.
- Monthly: Inspect and lubricate seals, check for cracks or odor issues.
If you’re on a long trip, increase cleaning frequency during hot weather. Heat speeds up bacteria growth.
Table: Cleaning Frequency by Usage Type
| Usage Scenario | Emptying Frequency | Deep Cleaning |
|---|---|---|
| Weekend camper | Every 2 days | After each trip |
| Full-time RV living | Daily | Weekly |
| Boating/Seasonal use | As needed | Before and after storage |
Eco-friendly Options And Safe Disposal
Many campgrounds now require eco-friendly chemicals. Check local rules before you travel. Never dump untreated waste in nature or regular drains.
Better options:
- Use green-certified fluids (safe for septic tanks)
- Try enzyme-based cleaners (break down waste naturally)
- Rinse with vinegar instead of harsh chemicals
External Resource: For more on safe and eco-friendly RV toilet chemicals, see this Camping World Guide.

Credit: www.youtube.com
Troubleshooting Odors And Problems
Sometimes, even after cleaning, your cassette may still smell or have issues. Here’s what to check:
- Persistent odor: Clean seal thoroughly, use bio tablets, and air out the cassette.
- Leaks: Check rubber gaskets for cracks. Lubricate or replace if damaged.
- Clogging: Use less paper, break up solid waste with more water, and avoid “flushable” wipes.
- Sticking valves: Clean and lubricate moving parts regularly.
- Chemical residue: Rinse thoroughly. Switch to a different brand if buildup occurs.
Table: Common Problems and Solutions
| Problem | Likely Cause | Quick Fix |
|---|---|---|
| Bad smell after cleaning | Missed seal or spout | Deep clean and air dry |
| Leaking valve | Dry/damaged seal | Lubricate or replace seal |
| Difficulty emptying | Clogged with paper | Add water, shake, and rinse |
Practical Tips For Stress-free Cleaning
- Always clean in daylight to see inside the cassette.
- Keep a small supply kit (gloves, brush, chemical) near your RV door.
- Take your time—rushing creates more mess and stress.
- In hot weather, empty more often to avoid “surprises.”
- If you have kids, teach them not to flush non-toilet items.
Another insight: Letting the cassette sit full for days is the #1 cause of stubborn smells. Even if it’s not full, empty and rinse before driving long distances.
Credit: thepopupprincess.com
Frequently Asked Questions
How Do I Get Rid Of Stubborn Odors In My Toilet Cassette?
Deep clean using a cassette-safe cleaner and rinse with vinegar. Let the cassette dry completely with the cap off. If smells persist, check seals and spout for hidden buildup.
Can I Use Household Bleach Or Disinfectants?
No. Bleach damages rubber seals and plastic. Use only cleaners labeled as safe for cassette toilets.
Is It Safe To Use Regular Toilet Paper?
It’s better to use RV-safe toilet paper. Regular paper can cause clogs and make cleaning harder.
What If My Cassette Is Leaking?
Check the rubber seals for cracks or wear. Lubricate with a proper seal conditioner or replace the seal if needed.
How Do I Store My Cassette In The Off-season?
Clean and dry thoroughly. Leave the cap off to air out. Store in a cool, dry place to prevent mold and keep seals flexible.
Cleaning your toilet cassette isn’t glamorous, but it makes every trip more comfortable. With the right products and habits, you’ll avoid trouble and keep your RV or boat smelling fresh. Next time, you’ll know exactly what to do—and you’ll never fear opening the cassette again.