How to Make a Camping Toilet: Simple DIY Guide
Figuring out how to make a camping toilet doesn't have to be complicated. You can build a sturdy, odor-free unit using common hardware store items for under $40. This approach saves money compared to commercial models while offering custom sizing for your specific setup.
The Centers for Disease Control and Prevention (CDC) highlights that proper sanitation prevents disease transmission in outdoor settings. A well-sealed DIY system addresses this by containing waste effectively. We’ll walk through the exact materials and assembly steps you need.
The 5-Gallon Bucket Blueprint: Materials and Tools You Actually Need
A successful build relies on rigid plastics and precise cuts. You don’t need specialized gear, just standard construction supplies. Here is what goes into the cart.
| Item | Specification | Purpose |
|---|---|---|
| Bucket | 5-gallon HDPE (White) | Main waste container |
| Lid | Tight-fitting plastic | Base for seat mount |
| Seat Adapter | Polypropylene ring | Comfort and stability |
| Vent Pipe | 4-inch PVC, 18 inches | Odor exhaust |
| Hardware | Stainless steel screws | Rust resistance |
You’ll also need a jigsaw or hole saw kit. Sandpaper helps smooth rough edges. Contractor-grade trash bags are non-negotiable for durability.
Thin kitchen bags tear easily. Always check portable toilet chair options if you prefer buying over building. But for customization, nothing beats a bucket build.
Step-by-Step Assembly: From Raw Plastic to Stable Seat
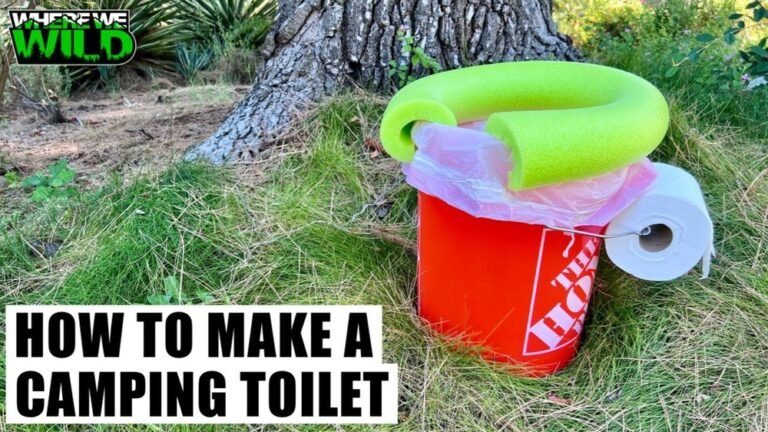
Start by securing the liner bag inside the bucket. Fold the top edge over the rim tightly. Next, cut a circular opening in the lid.
It should match your seat adapter’s diameter exactly.
Drill four pilot holes near the center of the lid. Attach the seat adapter using stainless steel screws. Ensure it sits flush against the plastic.
Wobble here means instability later.
Install the vent pipe next. Cut a small hole in the side of the bucket, near the top. Insert the PVC elbow.
Seal it with marine-grade silicone caulk. This creates an airtight path for gases. For those unsure about structural integrity, reviewing homemade toilet for camping guides can offer additional reinforcement tips.
Odor Control Secrets: Ventilation Pipes and Urine Diversion
Smell is the biggest complaint with DIY toilets. Effective ventilation solves this. The 4-inch PVC pipe acts as a solar chimney.
Sunlight heats the air inside, creating upward draft. This pulls odors out before they escape the lid.
Add a carbon filter to the top of the pipe. Replace it every three months. Alternatively, install a urine diversion funnel.
This separates liquid from solid waste. Liquid produces less odor and reduces bucket volume significantly.
Many users struggle with lingering smells. Our research shows that mixed-waste buckets fail faster than diverted systems. Check camping toilet chemicals if you opt for single-chamber designs.
Enzymatic cleaners break down solids effectively. Avoid harsh bleach, which kills beneficial bacteria in composting setups.
Common Build Mistakes That Cause Leaks or Wobbles
Loose seals are the primary failure point. If the lid doesn’t clamp down hard, gas escapes. Use a bungee cord or latch mechanism to secure the lid tightly.
Never rely on gravity alone.
Another error is using thin plastic bags. They rip during movement. Stick to 1.5-mil thick contractor bags.
Also, ensure your hole saw matches the seat adapter perfectly. Gaps allow waste to splash onto the lid surface.
Instability often comes from weak hinges. If you add a wooden frame, use exterior-grade plywood. Interior wood rots quickly in humid campsites.
Refer to must have camping toilet accessories for reliable latching hardware. Proper alignment prevents stress cracks in the bucket walls.
FAQ: Disposal Rules, Winterizing, and Cost Breakdown
How much does a DIY camping toilet cost?
Most builds range from $25 to $45. Costs depend on whether you buy new or repurpose items. A basic bucket and lid set costs under $15.
Hardware adds another $10. Ventilation pipes and filters account for the rest. Compare this to commercial units costing $200+.
Can I use this toilet in freezing weather?
Yes, but precautions are necessary. Water expands when frozen. Empty the bucket completely before temperatures drop below 32°F.
Store the unit indoors or insulated. Add antifreeze agents only if compatible with your disposal method. See how to keep a portable toilet from freezing for detailed winterization steps.
Where do I dispose of the waste?
Follow local regulations strictly. In campgrounds, use designated dump stations. Never pour waste into storm drains or natural waterways.
The Environmental Protection Agency (EPA) mandates proper sanitation handling. For backcountry use, pack-out rules apply. Check where to dump portable toilet waste for location-specific guidelines.
Is a composting setup better than a bucket?
It depends on your stay duration. Buckets suit short trips. Composting requires time for decomposition.
Solid waste needs six to twelve months to cure safely. For immediate use, stick to sealed liners. Learn more about the differences in composting toilet vs outhouse comparisons.